How to uninstall Internet Explorer 11 ………?
 Today i am learn how to uninstall internet explorer 11 in all operating system ….

Lets start now —-start the computer and press window+R key then write text appwiz.cpl then click on the update install on left side of the window page then its show
Making Ethernet Cables – Tricks of the Trade

How to MAKE AN ETHERNET CABLE
1.Purchasing Ethernet cables may be quite costly and pre-made lengths are not continually the period you need. Making Ethernet cables is straight forward with a container of bulk category 5e Ethernet cable and RJ-45 connectors which can be attached to the cut ends of your chosen cable length.
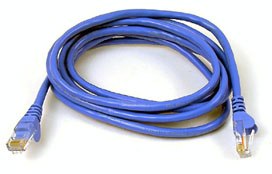
2.Bulk Ethernet Cable – Category 5e or CAT5e (you may also use Category 6 or CAT6 cabling which has better performance specs and is set 20% greater high priced than CAT5e.)

3.Bulk RJ45 Crimpable Connectors for CAT-5e
or
Bulk RJ45 Crimpable Connectors for CAT-6
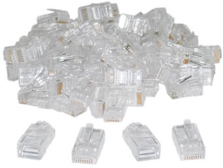
4.RJ-45 Crimping tool

5.There are sorts of Ethernet cables you could make, Straight through and Crossover.
Straight via Ethernet cables are the same old cable used for nearly all functions, and are regularly called “patch cables”. It’s far especially recommend you duplicate the coloration order as proven at the left. Note how the inexperienced pair isn’t side-by way of-aspect as are all the other pairs. This configuration permits for longer cord runs.
6.CROSSOVER CABLES – The reason of a Crossover Ethernet cable is to immediately join one laptop to any other laptop (or device) with out going via a router, switch or hub.

7.Here’s a way to make a standard cable:
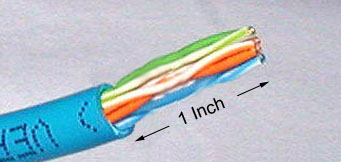
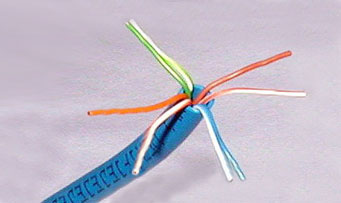
Cut into the plastic sheath about 1 inch (2.5 cm) from the give up of the reduce cable. The crimping tool has a razor blade so one can do the trick with practice.
8.Unwind and pair the same colorings.
9.Pinch the wires among your arms and straighten them out as shown. The coloration order is vital to get accurate.
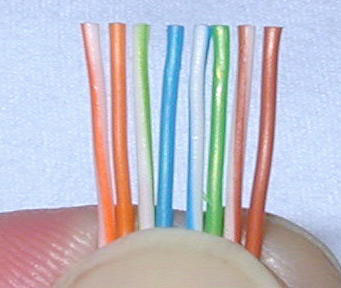
10.Use scissors to make a straight cut throughout the 8 wires to shorten them to 1/2 Inch (1.3 cm) from the reduce sleeve to the give up of the wires.
![bargain_left_handed_scissors_small[1]-10](https://come2learnsj.wordpress.com/wp-content/uploads/2016/08/bargain_left_handed_scissors_small1-10.jpg?w=604)
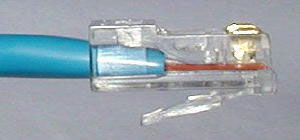
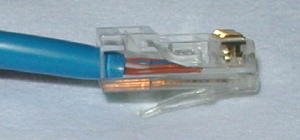
11.Carefully push all 8 unstripped colored wires into the connector. Be aware the location of the blue plastic sleeve. Additionally be aware how the wires cross all the manner to the quit.
Come 2 Learn
12.A view from the top. All of the wires are all the manner in. There are not any short wires.
Come 2 Learn
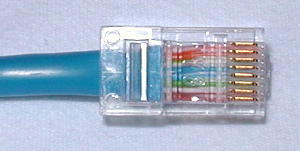
13.WRONG WAY– notice how the blue plastic sleeve isn’t in the connector where it may be locked into location. The wires are too long. The wires ought to amplify simplest half inch from the blue cut sleeve.

Come 2 Learn
14.WRONG WAY– note how the wires do no longer move all of the way to the stop of the connector.
Come 2 Learn
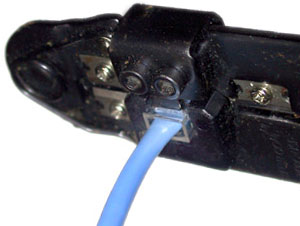
15.CRIMPING THE CABLE-carefully region the connector into the Ethernet Crimping and cinch down on the handles tightly. The copper splicing tabs at the connector will pierce into each of the 8 wires.There may be additionally a locking tab that holds the blue plastic sleeve in area for a good compression fit. When you take away the cable from the crimping, that stop is ready to use.
Come 2 Learn
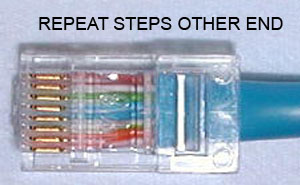
16.For a standard “Straight Through cable, repeat all steps and wire color order on the opposite stop of cable. For a cross – over cable, the alternative cease will have a unique shade order as shown with the aid of the crossover image .
Come 2 Learn
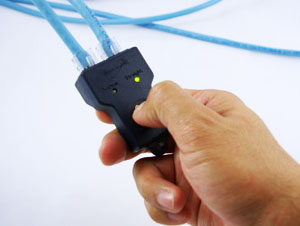
17.Ensure to check the cables earlier than installing them. An less expensive Ethernet cable tester does this quite well.
Come 2 Learn
Be aware – The most cable length of CAT-5, CAT-5e or CAT-6 Ethernet cable is 328 feet or a hundred meters.
How to Assign DNS Server Address To Your Computer
 Domain Name System (DNS ) is used to clear up domains to IP addresses. In net, every communication is primarily based on IP cope with however it’s miles difficult to recall the 32 bit IP address for a regular person. DNS server is resolving this difficulty through assigning a completely unique call for a particular IP cope with. Each computer linked to the internet should have domain name gadget records to speak different gadgets related to net. In case your laptop faces any DNS issues, one of the critical solution is to assign Open/ Google DNS server addresses to your pc. In our many troubleshooting publications we endorse this answer and it is vital to jot down a supporting article, with steps to assign unique server addresses in your laptop, for other troubleshooting publications.
To assign this info to windows 7, windows 8 , windows 10 and windows Vista computer systems, comply with the steps under.
Different Methods to Assign DNS Server Address To Your Computer :
1.Click on start button 2.Go to Control Panel 3(A).Control Panel in Category view
- Tick on Network and Internet
- Tick on Network Status and Tasks
- Tick on Change Adapter Settings
3(B). Control Panel in Large icons/ Small icons view
- Tick on Network and Sharing Center
- Tick on Change Adapter Settings
4 Right click on the Network symbol
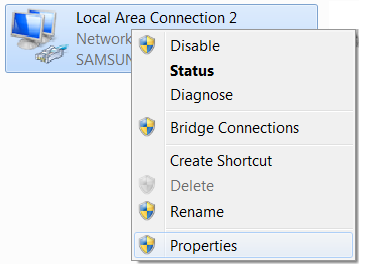
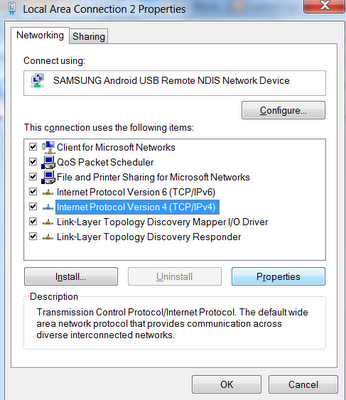
5.Click on Properties 6.Select Internet Protocol version4 (TCP/IPv4)and Click on Properties
- Select Use the Following Domain Name system Server addresses
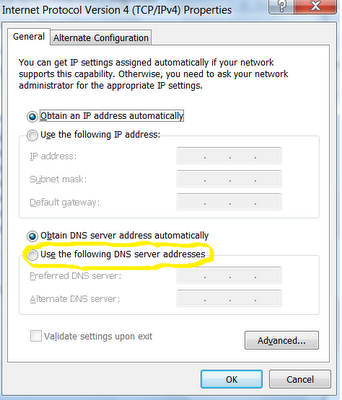 You could use one of the following addresses as number one and secondary DNS server addresses.
OpenDNS addresses are:
Primary OpenDNS : 208.67.222.222
Secondary OpenDNS: 208.67.220.220Google Public DNS Addresses are:
Primary Google DNS : 8.8.8.8
Secondary Google DNS: 8.8.4.4You can also use below address : Preferred DNS server : 214.218.245.1 Alternate DNS server : 214.218.245.123
If you face any Ping request issue(Ping Request Could not Find Host. Please Check the Name and Try again) , follow the steps provided in the link below.
http://wp.me/p6Qv3N-69
Ping Request Could not Find Host. Please Check the Name and Try again
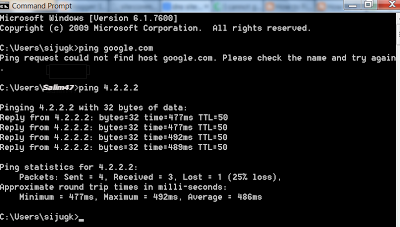
 In case your computer faces any DNS related troubles, one of the fundamental Ping mistakes code you could receive at the same time as ping to any area call is Ping request could not locate host [website Name]. Please test the name and attempt once more. This error message says your computer couldn’t locate the domain call as it failed to remedy the host name to IP deal with. This DNS issue blocks your pc from accessing any domains by typing the internet site addresses on browser.
Within the underneath picture you may see I tried to ping Google.com however didn’t get reply from the Google server. As an alternative of having reply from the host, I obtained the mistake message “Ping request could not discover host Google.com. Please take a look at the name and try again”. However, when I ping to a selected IP address (here I used global DNS deal with), ping request effectively received respond.
To repair any DNS server issues in a pc, follow the steps underneath.
Flush contemporary DNS info stored and release new IP.
One way to restore DNS troubles your pc is to flush modern DNS server deal with precise stored. To eliminate saved DNS info, follow the steps beneath.
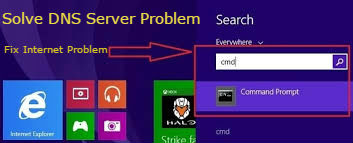
- Click on Start
- Go to Command Prompt then RUN
- Type below command and press enter
- Ipconfig /flushdns
- Ipconfig /release
- Ipconfig /renew
Now try to ping Google.com and test whether you get the error message again “Ping request could not find host Google.com. Please check the name and try again”.
Then follow step 2 :
2.When you ping google.com then show underneath end result

So please follow some advance command to solve the issue.
Some commands in order to reinitialize various network states :
Reset WINSOCK passes to installation defaults : netsh winsock reset catalog
Reset TCP/IP load to installation defaults : netsh int ip reset reset.log
Flush DNS resolver cache : ipconfig /flushdns
Renew DNS client registration and refresh DHCP agreements : ipconfig /registerdns
Flush routing table : route /f (reboot required)
3. Assign Working DNS Server Addresses
To fix the DNS issues in your computer we need to assign correct DNS addresses in your computer. To do this follow the steps provided in the link below.
If this newsletter is helpfull so please don’t forget comment.
How to know ADMIN PASSWORD THROUGH GUEST ACCOUNT
Hello guys, Today will provide you 2 awesome and smooth trick through which you can hack admin account via guest account.

In case you been the use of someones laptop in visitor(guest) account and want to have Admin privilege then worry no longer,there may be a trick which will advantage Admin Privilege .
we could get started out with it.
Method 1
1) visit C:/home windows/system32.
2) replica cmd.exe and paste it on laptop.
3) Rename cmd.exe to sethc.exe.
4) Replica the brand new sethc.exe to gadget 32,while home windows asks for overwriting the report,then click on sure.
5) Now log off from your guest account and on the user pick out window,press shift key 5 times.
6)In preference to Sticky Key affirmation conversation,command activate with complete administrator privileges will open.
7) Now kind “ net user ADMINISTRATOR “come 2 learn” where “come 2 learn” can be any password you want and press input.
8) You’ll see “ The Command finished successfully” after which go out the command set off and login into administrator together with your new password.
9) Bravo !! Now you have got hacked admin thru guest account.
Method 2
That is second other technique you can use to hack admin password without understanding it.
it is feasible to trade Adminstrator password both in Win XP and Vista without understanding it. in case you a few how manipulate to login as an Administrator then you could alternate the password with out understanding it.
Here’s the Step-by means of-Step instructions.
1) Proper-click on at the “My pc” icon at the laptop OR inside the start Menu.
2)Choose the choice “control”.
3) At the left pane enlarge the “laptop management (nearby) tree (if it isn’t always already increased)
4) Double click on “neighborhood users and organizations” alternative From “system equipment” tree.
5) click on the “customers” choice.
6) Now you will see the list of customers on the proper side pane, consisting of Administrator, guest etc.
7) Right click the “Administrator” and choose the choice “Set Password” choice.
8) Now you will see a warning message, click on proceed.
9) Now the device asks you for “New Password” and “affirm Password” .
10) After getting into the password click on on “good enough”. The password is changed. That’s It!..
You have now correctly modified admin password without understanding it.
I hope you like both the methods that I provied you today.
Advantages and Benefits of Linux
 Linux being an open source software has no owner, it can be developed,debugged and distributed by anyone.The foremost advantage of Linux is its cost: the core Operating System is available free, many software applications also come with a General Public License.It can be used concurrently by large number of users even without slowing down its performance.It is a great networking platform and works at most advantageous competence even with little available hard disk space.It can run on a wide range of hardware types likes PCs,Macs, supercomputers.
A Short History Of Linux Operating System and how it Became so Popular
![]()
If you are a supporter of all things IT you’d be forgiven for thinking that this thing called Linux has just looked out of nowhere.
Infact, you might be shocked to discover that Linux has been around in it’s current form since the early 90’s but the details go back much longer.
Late 1960’s – Unix is established and released in 1970’s. It is widely implemented in business and academic circles.
1983 – a programmer Richard Stallman produces the GNU Project. It is an attempt at creating a Unix type operating system but collected of wholly free software.
1987 – An additional programmer Andrew S. Tanenbaum creates Minix, a Unix like operating system for Academic use.
1991 – a Finnish student Linus Torvalds creates a non commercial version of Minix and calls it Linux. The Linu is from Linus and the x is from the ‘ix’ part of Minix.
The convenience is history.
For more info on Linux history squared out this Wikipedia article.
My Screen Black when i start Windows 7
 How to fix Black screen at starting Windows 7 ?
- Restart Your Computer and while your computer start press F8 now screen appear advance boot menu option.
- In this Option go to safe mode option and press Enter
- Your computer is start in safe mode now Go to Start > All Programs > Accessories > System Tools Read the rest of this entry
Shortcut keys for windows
 List of keyboard shortcut key for windows

Windows General shortcut keys on keyboard
For File
- Ctrl + C (Copy)
- Ctrl + X (Cut)
- Ctrl + V (Paste)
- Ctrl + Z (Undo)
- Ctrl + P (Print Documents or pictures)
- Ctrl + A (Select All)
- Delete (Delete file or word)
- Ctrl + Right Arrow (Move the point to right)
- Ctrl + Left Arrow (Move the point to left)
- Ctrl + Up Arrow (Move the point to Up)
- Ctrl + Down Arrow (Move the point to Down)
- Ctrl + Shift (High light Text)
- Shift + Arrow key (select document or word)
- Alt (for see menu bar)
For windows
- Alt + F4 (For close open folders,files)
- Alt + Tab (for go to next open window)
- Alt + Esc (for open start menu)
- Ctrl + Shift + Esc (open Task Manager)
- Alt + Ctrl + Del (open Task Manager)
- Alt + Space bar (for open a system menu of open window)
- Esc (Cancel task)
- Backspace (to back in mycomputer or in explorer)
- F2 (Rename File or Folder Name)
- F3 (For Search Files and Folders)
- F4 (Go to Address Bar)
- F5 (update item or desktop)
- F10 (activate menu bar of active program)
For Windows Program
- Windows Logo (show Start menu and hide also)
- Windows Logo + D (show desktop)
- Windows Logo + F1 (for help windows
- Windows Logo + R (Open Run)
- Windows Logo + L Lock the keyboard or Lock logon Screen)
- Ctrl + Windows Logo + F (for search Computer)
- Windows Logo + F (open Search files folders)
- Windows Logo + U (utility manager)
- Windows Logo + Shift + M (Restore Window)
- Windows Logo + Break (open system properties)
For Microsoft Management Console
- Ctrl + N (new console)
- Ctrl + O (open saved console)
- Ctrl + S (Save console)
- Ctrl + M (Add or Remove Item of Console)
- Ctrl + W (new Window)
- Alt + A (Display Menu)
- Alt + O (Display Favorites menu)
- Alt + F (Display File Menu)
- Alt + V (display View Menu)
- Ctrl + P (Print current Page or Active page)
- F1 (for help Topic)
- F2 (rename Selected Item)
- F5 (update the content of all console)
- Alt + Minus (-) (Display Windows Menu of console)
- Ctrl + F5 (Restore the Window of console)
- Ctrl + F10 (Maximize the Window of console)
- Alt + Enter (Properties wizard of select and open item)
- Alt + F4 (Close the active console)
For Accessibility
- Shift Five times (Switch Sticky keys)
- Right Shift For 8 Second (Switch Filter Keys)
- Num Lock For five second (switch toggel key)
- Left Alt + left Shift + Printscrn (Switch high contrast)
- Left Alt + left Shift + Num Lock (Switch Mouse Keys
My computer is restart without any Error, Message and Reason
 How to fix computer restart without any Error, Message and Reason

There is many reason of automatically restart your computer
1. Due to virus
Scan your Computer with your antivirus in safe mode to solve your computer restart
2. Due to Faulty Hard disk
Faulty hard disk is a reason of restarting your computer again and again so check your hard disk in safe mode using command prompt in the command prompt type chkdsk C:
3. Due to RAM
Remove your RAM from your computer and check if its heating , wait for cooling and insert RAM back if You not done check your RAM in other Computer. And other computer RAM to your computer.
4. Due to attaching External USB Device
If this issue you want to remove all External USB Device and start your computer now insert all your device one by one and check which USB device is corrupt or causing problem.
5. Due to Over heating
This reason is I have faced many time so please keep your computer cool remove your system case and turn on your computer.
6. Due to Video Driver
I have also face this reason to restart computer so update your Video driver in safe mode Right click on your computer click on manage and select device manger in computer management wizard now update your display adapter by right click on display driver and select update driver.
7. Due to Software
If you have install recently new games or application so remove it and run your computer
8. Due to mother board
If you not found any solution so check your motherboard bios, IC, Capacitor and give to hardware vendor to repair your mother board.
Windows computer restart without warning
 If your Windows computer restarts or reboots without caution automatically here are a little submission which may help you detect and fix the problem. There are some goals that could cause this to occur. The difficult could some! It could be collapse of some hardware part, over- reheating, Windows Update or a Stop Error.
Computer restarts automatically without caution
You will have to detect your submission and then see which of the following circumstances applies to you. Do you become to see a Blue Screen? Does your computer over-reheating? Updated your Driver in recent times? Installed specific Windows Updates? Once you can detect the feasible affect, objects could be a bit easier.
Reboot after Blue Screen or Stop Error
To block a software or driver problem from restarting your computer over and over again after a Stop Error, do the following. You necessary to do this so that you can convert the error code, which in scare can help you troubleshoot the difficul.
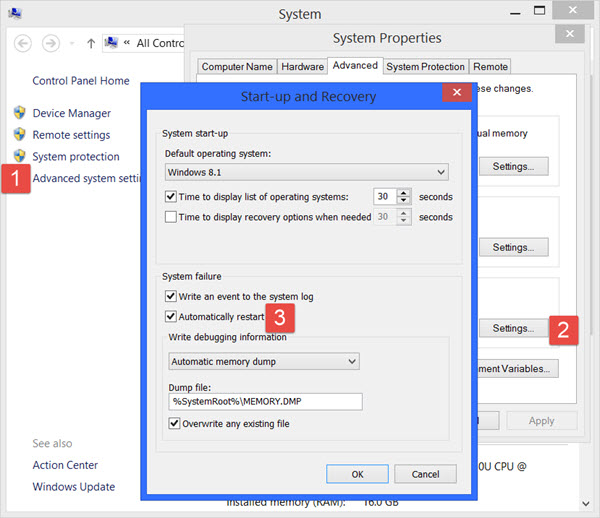
Using the WinX Menu of Windows any, open System. Next click on Advanced system settings > Advanced tab > Startup and Recovery > Settings.
Uncheck the Automatically restart box. Click Apply / OK and Exit.
Now if your Windows were to dad due to a Stop Error, it will not restart the computer but will display the error notice, which can help you troubleshoot the Blue Screen.
This post on Windows Stop Errors or Blue Screens Guide and Resources will help you troubleshoot the problem.
Rebooting due to Hardware failure
Hardware failure or system uncertainty can root the computer to reboot automatically. The could be the RAM, Hard Drive, Power Supply, Graphic Card or External devices: – or it could be an overheating or BIOS issue.
This post will help you if your computer freezes or reboots due to Hardware issues
Restarting after Windows Update every time
If your machine gets into an permanent reboot circle, try to get into Safe Mode or access Advanced Boot Options. Here you can wide open a command prompt windows or system restore or achieve an Automatic Repair. Windows 7 users may want to contemplate repairing Windows 7.
See this stake if your Windows is stuck in a reboot loop after Windows Update. and this one if you receive a Your PC will automatically restart in one minute point in Windows 10.
Driver problems causing reboots
If you freshly updated your device drivers and now find that your Windows restarts without caution, you might want to troubleshoot your Driver problems or ponder rolling back your driver to the previous version.This post will display you how to Uninstall, Disable, Roll Back, Update Device Drivers
Scan your Windows for malware
Malware or virus infection could also be a likely reason for your computer restarts. Deep scan your system with your antivirus software. You may need to also use a second-opinion on-demand antivirus software to scan your Windows, just to be especially certainly.
I hope approximately here helps you. If you have any efforts to add, please do so in the comments section.Windows PC running slow? Click here to make your Windows computer run as fast as new, again
